.png)

Objective: Assist rescuers in recognizing signs and symptoms of an allergic reaction, a dangerous over-reaction of the body’s immune system to an allergen.
Time: 1-2 minutes Skill Level: Intermediate Supplies: (Available at: www.moulageconcepts.com) Ingredients:
Equipment:
Technique:
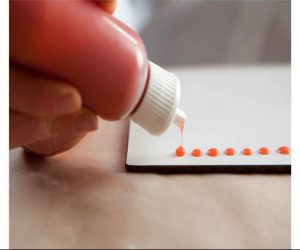
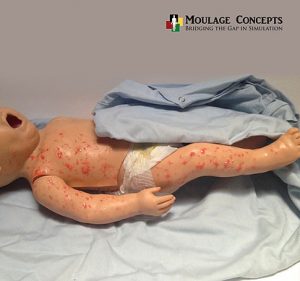
Create Individual pustules. Heat the Moulage-gel to 120°F. On the laminated board, combine 3 cc of flesh-colored Moulage-gel material with 5 drops of red Moulage-gel. Stir the Moulage-gel mixture thoroughly with the back of the palette knife to blend, creating a fleshy pink color. Allow Moulage-gel mixture to set fully before pulling up and remelting in the 20-cc syringe. Using a drop-by-drop method, allow small pustules of moulage gel to cool on board. Using moulage gel as a glue, adhere individual pustules to simulators skin. Quick Fix:
Rash (also called urticaria) can be quickly applied to the skin of simulated patient using a stipple sponge that has been dipped in moulage gel.  Heat the Moulage-gel to 120°F. On the laminated board, combine 3 cc of flesh-colored Moulage-gel material with 5 drops of red Moulage-gel. Stir the Moulage-gel mixture thoroughly with the back of the palette knife to blend, creating a fleshy pink color. Allow Moulage-gel mixture to set fully before pulling up and remelting in the 20-cc syringe. Reduce the temperature of the Moulage-gel to 100°F. On the laminated board, pool a small amount of moulage gel. Using one side of a stipple sponge, submerge sponge into gel and gently apply to skin of simulator using a gentle blotting motion. When applying sponge to skin, care should be taken to not compress the sponge, apply only enough pressure to deposit the gel on the skin while maintaining the square shape of the sponge. Scenario: You are having dinner at Charlie’s Seafood Restaurant, when you hear a young lady yelling for help. Her boyfriend is having difficulty breathing. Scene:  Patient is a 20-year-old with a sudden onset of difficulty breathing while eating dinner. His girlfriend says he had an allergy to shellfish, and he didn’t realize there was shrimp in in the appetizer. As you begin engaging with the patient who appears to be struggling to respond, he collapses on the floor. An ambulance is called, what will you do next? Young adult simulator: Create pallor and sweat on face of victim.  Using a make-up sponge, gently blot white makeup over the face of the patient, allowing some natural skin to show through and blend well. Redden the area around victims upper and lower eyes. Using a red make-up pencil, carefully apply colorant to end of cotton swab. Swipe upper and lower eye lids with cotton swab, around the lash line; repeat process to intensify eye reddening if needed. Carefully apply pustules to face, chest, and neck of victim. Create beads of sweat on the skin by applying a light mist of sweat mixture to the forehead, chin, and upper lip of simulator. Patient Information:
Note: If using simulators, make-up techniques may be duplicated using the SIM-Safe series. Use in Conjunction With:
 Cleanup and Storage: Gently remove pustules from skin of victim. Store pustules on a waxed paper–covered cardboard wound tray. Pustules should be stored side-by-side, but they should not touch to avoid cross-color transference. Loosely wrap wound trays with plastic wrap and store flat in freezer. Using a soft clean cloth or make-up remover towelette, remove the make-up and any remaining product residue from the skin. Used tissues can be air dried and stored in moulage box for future use.

Bobbie Merica is the owner of Moulage Concepts Inc., a medical-trauma moulage company and author of several moulage training books specific to the simulation communities including “Medical Moulage – How to Make Your Simulations Come Alive.” Upon discovering the absence of Moulage specific to a clinical/hospital setting, she designed and developed the first of a series of 3D clinical wounds that can be triaged, sutured, debrided and drained in addition to medical & trauma moulage kits, workshops and wound development specialized to the MCI, clinical, pre-hospital, military, pandemic and veterinary simulation communities. Mrs. Merica is a contributing author at: EMSWorld magazine, “Wound of the Month” Trauma Moulage specialized to the pre-hospital communities SimTalk Blog: Discussions in healthcare education from Pocket Nurse “Bridging the Gap in Simulation – A Collaboration of Experts” a free Medical Moulage Tutorial Blog (available at www.moulageconcepts.com) Subject Matter Expert: TCCC Talon Tactical Medicine TECC Peaceful Warrior Training Group Technologies Specialist Advisory Board member Homeland Security Exercise & Evaluation Program (HSEEP) certified.]
More articles by the writer
Objective: Assist rescuers in recognizing signs and symptoms of an allergic reaction, a dangerous over-reaction of the body’s immune system to an allergen.
Time: 1-2 minutes Skill Level: Intermediate Supplies: (Available at: www.moulageconcepts.com) Ingredients:
Equipment:
Technique:
Create Individual pustules. Heat the Moulage-gel to 120°F. On the laminated board, combine 3 cc of flesh-colored Moulage-gel material with 5 drops of red Moulage-gel. Stir the Moulage-gel mixture thoroughly with the back of the palette knife to blend, creating a fleshy pink color. Allow Moulage-gel mixture to set fully before pulling up and remelting in the 20-cc syringe. Using a drop-by-drop method, allow small pustules of moulage gel to cool on board. Using moulage gel as a glue, adhere individual pustules to simulators skin. Quick Fix:
Rash (also called urticaria) can be quickly applied to the skin of simulated patient using a stipple sponge that has been dipped in moulage gel.  Heat the Moulage-gel to 120°F. On the laminated board, combine 3 cc of flesh-colored Moulage-gel material with 5 drops of red Moulage-gel. Stir the Moulage-gel mixture thoroughly with the back of the palette knife to blend, creating a fleshy pink color. Allow Moulage-gel mixture to set fully before pulling up and remelting in the 20-cc syringe. Reduce the temperature of the Moulage-gel to 100°F. On the laminated board, pool a small amount of moulage gel. Using one side of a stipple sponge, submerge sponge into gel and gently apply to skin of simulator using a gentle blotting motion. When applying sponge to skin, care should be taken to not compress the sponge, apply only enough pressure to deposit the gel on the skin while maintaining the square shape of the sponge. Scenario: You are having dinner at Charlie’s Seafood Restaurant, when you hear a young lady yelling for help. Her boyfriend is having difficulty breathing. Scene:  Patient is a 20-year-old with a sudden onset of difficulty breathing while eating dinner. His girlfriend says he had an allergy to shellfish, and he didn’t realize there was shrimp in in the appetizer. As you begin engaging with the patient who appears to be struggling to respond, he collapses on the floor. An ambulance is called, what will you do next? Young adult simulator: Create pallor and sweat on face of victim.  Using a make-up sponge, gently blot white makeup over the face of the patient, allowing some natural skin to show through and blend well. Redden the area around victims upper and lower eyes. Using a red make-up pencil, carefully apply colorant to end of cotton swab. Swipe upper and lower eye lids with cotton swab, around the lash line; repeat process to intensify eye reddening if needed. Carefully apply pustules to face, chest, and neck of victim. Create beads of sweat on the skin by applying a light mist of sweat mixture to the forehead, chin, and upper lip of simulator. Patient Information:
Note: If using simulators, make-up techniques may be duplicated using the SIM-Safe series. Use in Conjunction With:
 Cleanup and Storage: Gently remove pustules from skin of victim. Store pustules on a waxed paper–covered cardboard wound tray. Pustules should be stored side-by-side, but they should not touch to avoid cross-color transference. Loosely wrap wound trays with plastic wrap and store flat in freezer. Using a soft clean cloth or make-up remover towelette, remove the make-up and any remaining product residue from the skin. Used tissues can be air dried and stored in moulage box for future use.
Vlad Magdalin

.jpg)