.png)
If you are like me and you love to teach, then you try to make it as easy as possible for your students. When it comes to showing them how to use the Bag Valve Mask(BVM) the students usually have a little bit of a problem grasping the idea of how to effectively deliver breaths. Over time I have come to understand that it is easier to demonstrate to the student what they should do after they see it on the video. It usually takes a very short time and it is worth it to increase their understanding and confidence. You should always try and reinforce what the video was showing them. Sometimes what we show them is not exactly what they saw or think they saw in the video, but they really don't realize it until they see you do it. Usually what I do is explain what the video was showing them and demonstrate what the video was trying to show them. Then depending on the circumstances I might introduce them to another way of doing the same thing. When I show them analternate method, I instruct them about using the one they saw in the video if they feel more comfortable doing so. Many of the students I instruct have small hands. Many come from countries like Indonesia and the Philippines so their hands and fingers are smaller and it is much more difficult for them to use the classic EC clamp technique with the BVM. To make it easier for them I show them how to grasp the crown of the mask (See figure 1)

which involves the stem rising from the mask. Using that as the starting point I then rest my hand on the other portion of the mask (see figure 2)
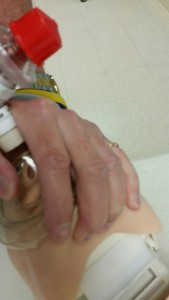
pretty much sealing it to the face. A note that I always stress is that whenever you place a mask on the face the rounded bottom portion should not extend below the chin. Then with the mask almost sealed I just reach very gently over the edge of the mask with my fingers (see figure 3)

grasp the jaw and pull the jaw and head back and up. I always tell them when they tilt the head of an adult back to give a breath they should be able to see down the nostrils of the patient. When they grip the chin with the remaining fingers it is easy for them to pull the head all the way back and then deliver an effective breath without causing any strain to their hands or wrists. Many of the students adopt the technique that I show them because they have tried the other one and have experienced pain in their fingers and wrists from trying to stretch over the mask in the classic EC technique. To use the EC technique you have to press your forefinger and your thumb on the edges of the mask over the face and then stretch your other fingers to grab the angle of the jaw on the side and lift the head and jaw back (see figure 4).

Many students cannot do this effectively and when they can’t get chest rise they lose confidence which makes it much more difficult for them to carry out the task of delivering effective breaths. As you can see from the pictures, I grasp the mask at the crown between my thumb and forefinger in the web and then rest my hand on the mask. Once I've done that, then I reach to the chin and pull the head and chin back and up in a gentle sweeping motion. There is no tension on my wrist or my fingers (See figure 5)

All I have to do is basically lay my hand on the mask and then extend my fingers to the chin and pull it back. If the person has extremely small hands or fingers, all they have to do is rotate their hand around the crown of the mask and then reach with their pinky or ring finger to grasp the jaw (see figure 6).
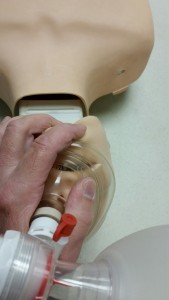
Whichever fingers can reach the jaw, will be able to pull it up and back. Once the jaw is extended and pulled back it is extremely easy to gently squeeze the bag and make the chest rise. Once the students realize how easy it is, they develop confidence,and their ability to do the task is greatly enhanced. When an emergency presents itself they will be sure of themselves and be able to carry out the task easily and effectively. With them having confidence and demonstrating their skills effectively, both the students and the teacher are happy with the outcome. I am especially happy because many of my students are studying to be EMT’s or Nurses and ride the ambulance as volunteers for my squad. It gives you a real sense of satisfaction when the people you taught are congratulated by other healthcare professionals for the job they did with a patient. It greatly increases their self-esteem and makes me feel good too.

John has been an AHA Instructor Trainer since 1993, and is involved at all levels of CPR science development and the introduction of various CPR enhancement techniques and equipment. Since retiring from the Port Authority in 2000, he has been actively spreading the news of increased effectiveness of improved CPR teaching and training by attending National and Local EMS conferences and presenting at the annual ECCU conference. In addition, he spends a good deal of time teaching AHA CPR and First Aid to doctors, nurses, PCT''s, EMTs, and security personnel in hospitals, doctors and dentists offices, Professional Trainers, gyms, shopping malls and pharmacies in New York and New Jersey. He also volunteers as EMT- BLS IT with the Woodbridge Township Ambulance & Rescue Squad as Chief of Operations and Training Director.
More articles by the writer
If you are like me and you love to teach, then you try to make it as easy as possible for your students. When it comes to showing them how to use the Bag Valve Mask(BVM) the students usually have a little bit of a problem grasping the idea of how to effectively deliver breaths. Over time I have come to understand that it is easier to demonstrate to the student what they should do after they see it on the video. It usually takes a very short time and it is worth it to increase their understanding and confidence. You should always try and reinforce what the video was showing them. Sometimes what we show them is not exactly what they saw or think they saw in the video, but they really don't realize it until they see you do it. Usually what I do is explain what the video was showing them and demonstrate what the video was trying to show them. Then depending on the circumstances I might introduce them to another way of doing the same thing. When I show them analternate method, I instruct them about using the one they saw in the video if they feel more comfortable doing so. Many of the students I instruct have small hands. Many come from countries like Indonesia and the Philippines so their hands and fingers are smaller and it is much more difficult for them to use the classic EC clamp technique with the BVM. To make it easier for them I show them how to grasp the crown of the mask (See figure 1)
which involves the stem rising from the mask. Using that as the starting point I then rest my hand on the other portion of the mask (see figure 2)
pretty much sealing it to the face. A note that I always stress is that whenever you place a mask on the face the rounded bottom portion should not extend below the chin. Then with the mask almost sealed I just reach very gently over the edge of the mask with my fingers (see figure 3)
grasp the jaw and pull the jaw and head back and up. I always tell them when they tilt the head of an adult back to give a breath they should be able to see down the nostrils of the patient. When they grip the chin with the remaining fingers it is easy for them to pull the head all the way back and then deliver an effective breath without causing any strain to their hands or wrists. Many of the students adopt the technique that I show them because they have tried the other one and have experienced pain in their fingers and wrists from trying to stretch over the mask in the classic EC technique. To use the EC technique you have to press your forefinger and your thumb on the edges of the mask over the face and then stretch your other fingers to grab the angle of the jaw on the side and lift the head and jaw back (see figure 4).
Many students cannot do this effectively and when they can’t get chest rise they lose confidence which makes it much more difficult for them to carry out the task of delivering effective breaths. As you can see from the pictures, I grasp the mask at the crown between my thumb and forefinger in the web and then rest my hand on the mask. Once I've done that, then I reach to the chin and pull the head and chin back and up in a gentle sweeping motion. There is no tension on my wrist or my fingers (See figure 5)
All I have to do is basically lay my hand on the mask and then extend my fingers to the chin and pull it back. If the person has extremely small hands or fingers, all they have to do is rotate their hand around the crown of the mask and then reach with their pinky or ring finger to grasp the jaw (see figure 6).
Whichever fingers can reach the jaw, will be able to pull it up and back. Once the jaw is extended and pulled back it is extremely easy to gently squeeze the bag and make the chest rise. Once the students realize how easy it is, they develop confidence,and their ability to do the task is greatly enhanced. When an emergency presents itself they will be sure of themselves and be able to carry out the task easily and effectively. With them having confidence and demonstrating their skills effectively, both the students and the teacher are happy with the outcome. I am especially happy because many of my students are studying to be EMT’s or Nurses and ride the ambulance as volunteers for my squad. It gives you a real sense of satisfaction when the people you taught are congratulated by other healthcare professionals for the job they did with a patient. It greatly increases their self-esteem and makes me feel good too.
Vlad Magdalin

.jpg)